目录
介绍
写在这篇文章之后:
https://qq742971636.blog.csdn.net/article/details/117959936
源码:
https://github.com/deepinsight/insightface
其中人脸识别模型的pytorch版本代码位置是:https://github.com/deepinsight/insightface/tree/master/recognition/arcface_torch。
安装环境
CUDA 11.6 + Python3.7
mxnet的gpu版本我没有安装成功,正常gpu版本安装是pip install mxnet-cu116 ,使用发现报错,查看 https://pypi.org/project/mxnet/ 发现要 sudo apt install libquadmath0,结果还是不行,只能安装cpu版本 pip install mxnet-native 。
python展开代码pip install mxnet-native tensorboard easydict sklearn
pip install torch torchvision torchaudio
数据
datasets :
https://github.com/deepinsight/insightface/tree/master/recognition/datasets
faces_umd数据中:
python展开代码(py37c) xd@gpu16:/ssd/xd/datasets$ unzip faces_umd.zip
Archive:  faces_umd.zip
   creating: faces_umd/
  inflating: faces_umd/train.rec
  inflating: faces_umd/agedb_30.bin
  inflating: faces_umd/property
  inflating: faces_umd/train.idx
  inflating: faces_umd/lfw.bin
  inflating: faces_umd/cfp_fp.bin
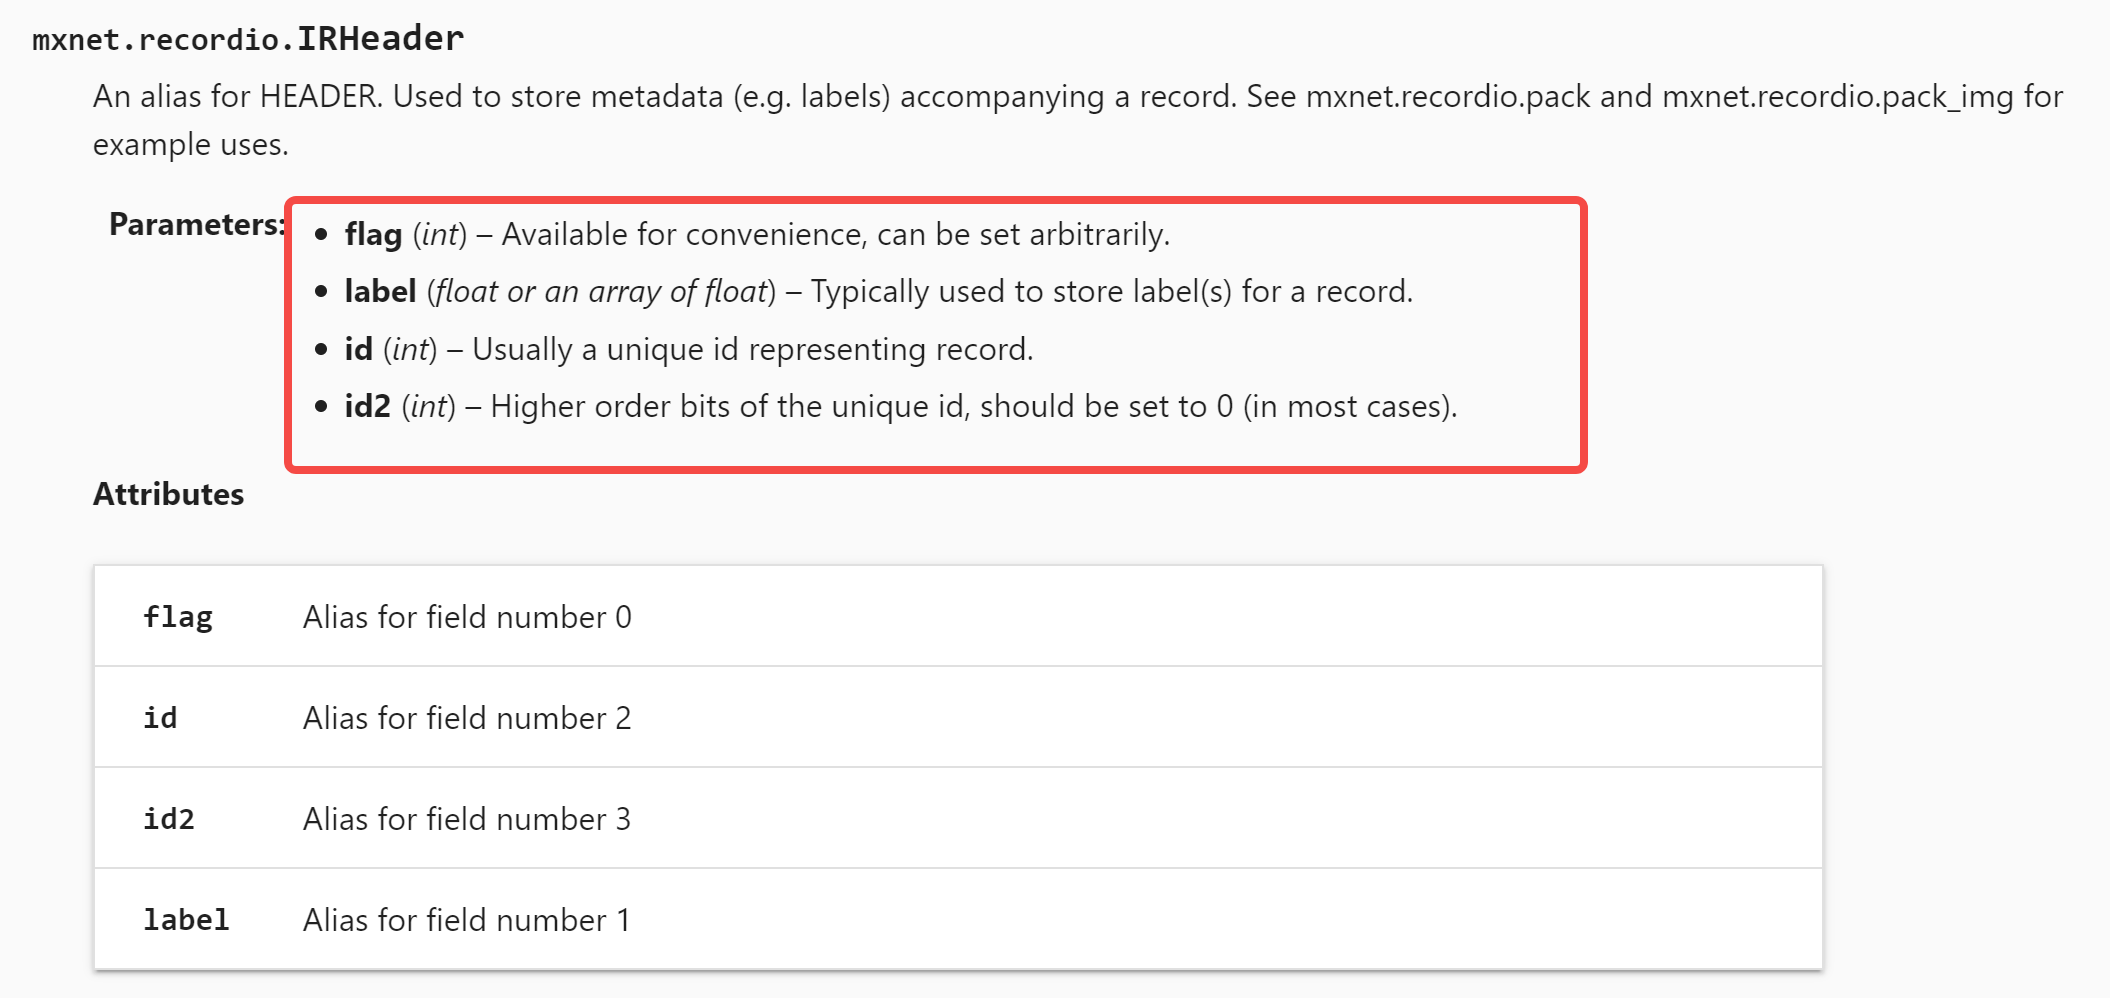
train.rec和/train.idx 是二进制文件存储文件,配合存储,程序里使用self.imgrec = mx.recordio.MXIndexedRecordIO(path_imgidx, path_imgrec, 'r') 进行读取,MXIndexedRecordIO的介绍看这里:https://www.cnblogs.com/hellcat/p/9094806.html#_label2。
val_targets ['lfw', 'cfp_fp', 'agedb_30'] ,其实几个bin文件将会用于验证集。
数据集的代码定义(非常优雅,rec idx这种方式相对于直接读取图片会更快):
python展开代码class MXFaceDataset(Dataset):
    def __init__(self, root_dir, local_rank):
        super(MXFaceDataset, self).__init__()
        self.transform = transforms.Compose(
            [transforms.ToPILImage(),
             transforms.RandomHorizontalFlip(),
             transforms.ToTensor(),
             transforms.Normalize(mean=[0.5, 0.5, 0.5], std=[0.5, 0.5, 0.5]),
             ])
        self.root_dir = root_dir
        self.local_rank = local_rank
        path_imgrec = os.path.join(root_dir, 'train.rec')
        path_imgidx = os.path.join(root_dir, 'train.idx')
        self.imgrec = mx.recordio.MXIndexedRecordIO(path_imgidx, path_imgrec, 'r')
        s = self.imgrec.read_idx(0)
        header, _ = mx.recordio.unpack(s)
        if header.flag > 0:
            self.header0 = (int(header.label[0]), int(header.label[1]))
            self.imgidx = np.array(range(1, int(header.label[0])))
        else:
            self.imgidx = np.array(list(self.imgrec.keys))
    def __getitem__(self, index):
        idx = self.imgidx[index]
        s = self.imgrec.read_idx(idx)
        header, img = mx.recordio.unpack(s)
        label = header.label
        if not isinstance(label, numbers.Number):
            label = label[0]
        label = torch.tensor(label, dtype=torch.long)
        sample = mx.image.imdecode(img).asnumpy()
        if self.transform is not None:
            sample = self.transform(sample)
        return sample, label
    def __len__(self):
        return len(self.imgidx)
RecordIO
https://mxnet.apache.org/versions/1.7/api/python/docs/api/mxnet/recordio/index.html
https://mxnet.apache.org/versions/1.9.1/api/faq/recordio
损失函数
不是单纯的arcface,而是CombinedMarginLoss,详见arcface论文 https://arxiv.org/pdf/1801.07698v1.pdf。
python展开代码class CombinedMarginLoss(torch.nn.Module):
    def __init__(self,
                 s,
                 m1,
                 m2,
                 m3,
                 interclass_filtering_threshold=0):
        super().__init__()
        self.s = s
        self.m1 = m1
        self.m2 = m2
        self.m3 = m3
        self.interclass_filtering_threshold = interclass_filtering_threshold
        # For ArcFace
        self.cos_m = math.cos(self.m2)
        self.sin_m = math.sin(self.m2)
        self.theta = math.cos(math.pi - self.m2)
        self.sinmm = math.sin(math.pi - self.m2) * self.m2
        self.easy_margin = False
    def forward(self, logits, labels):
        index_positive = torch.where(labels != -1)[0]
        if self.interclass_filtering_threshold > 0:
            with torch.no_grad():
                dirty = logits > self.interclass_filtering_threshold
                dirty = dirty.float()
                mask = torch.ones([index_positive.size(0), logits.size(1)], device=logits.device)
                mask.scatter_(1, labels[index_positive], 0)
                dirty[index_positive] *= mask
                tensor_mul = 1 - dirty
            logits = tensor_mul * logits
        target_logit = logits[index_positive, labels[index_positive].view(-1)]
        if self.m1 == 1.0 and self.m3 == 0.0:
            sin_theta = torch.sqrt(1.0 - torch.pow(target_logit, 2))
            cos_theta_m = target_logit * self.cos_m - sin_theta * self.sin_m  # cos(target+margin)
            if self.easy_margin:
                final_target_logit = torch.where(
                    target_logit > 0, cos_theta_m, target_logit)
            else:
                final_target_logit = torch.where(
                    target_logit > self.theta, cos_theta_m, target_logit - self.sinmm)
            logits[index_positive, labels[index_positive].view(-1)] = final_target_logit
            logits = logits * self.s
        elif self.m3 > 0:
            final_target_logit = target_logit - self.m3
            logits[index_positive, labels[index_positive].view(-1)] = final_target_logit
            logits = logits * self.s
        else:
            raise
        return logits
模型backbone
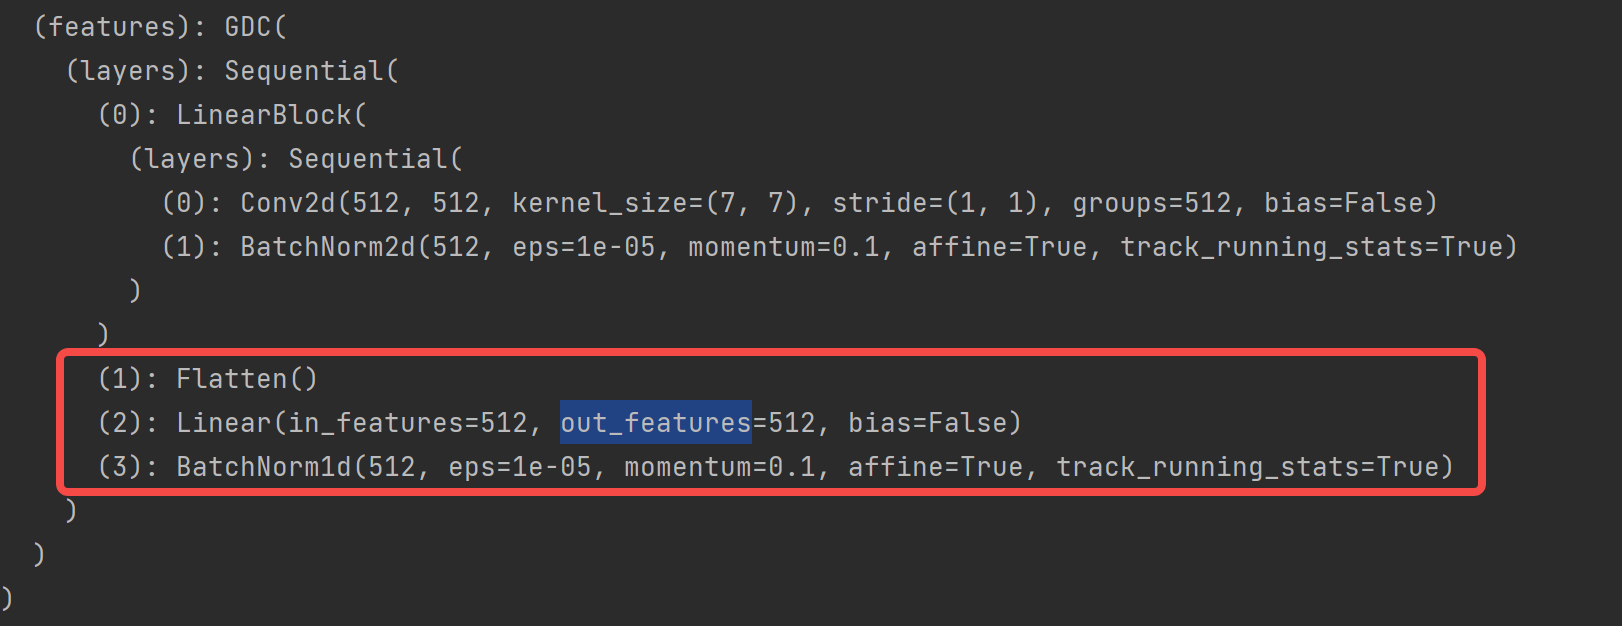
backbone采用“mbf”即是MobileFaceNet:
人脸特征想使用512特征后,MobileFaceNet最后几层是这样:
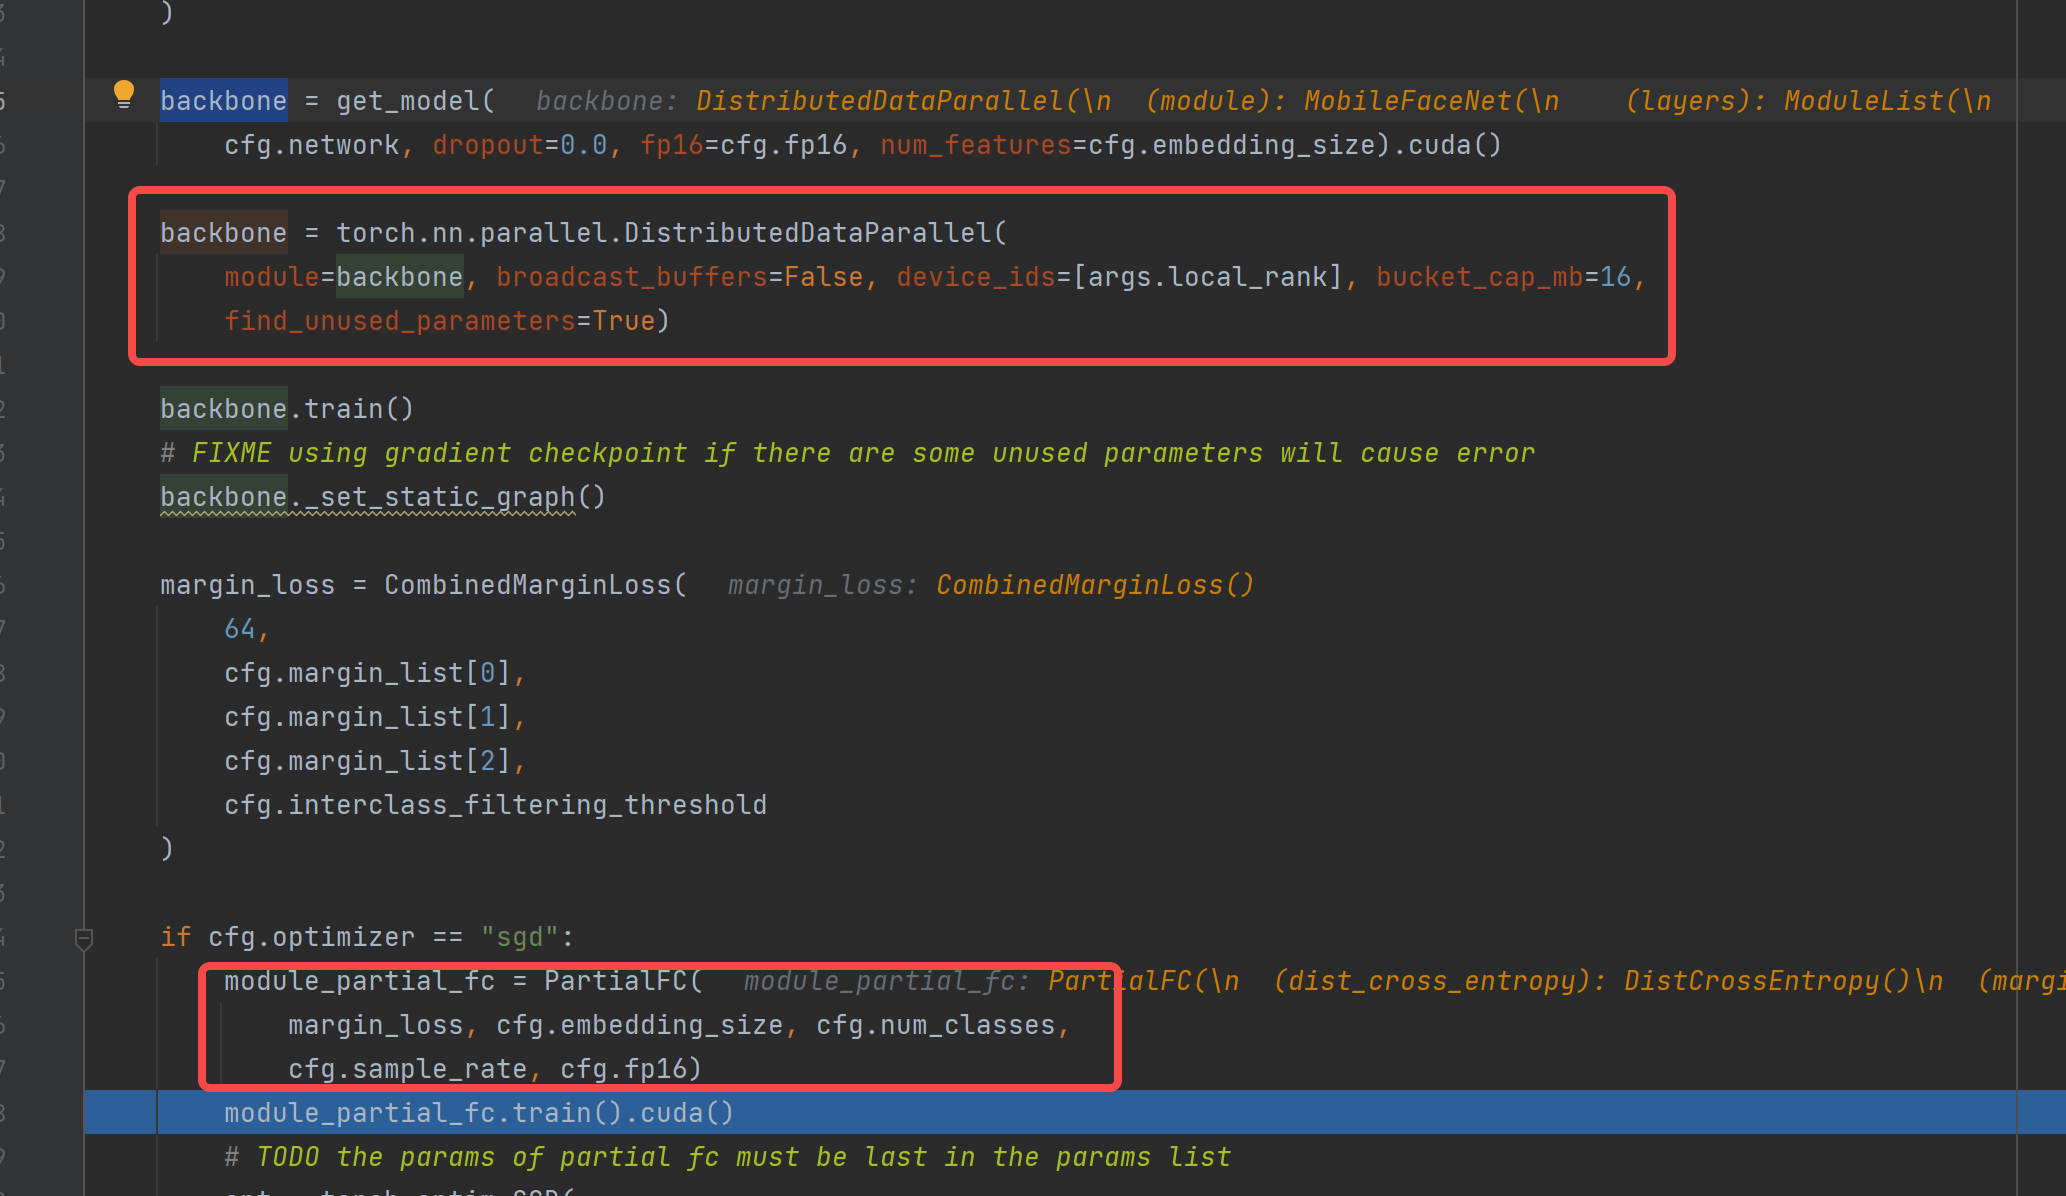
想要训练的是backbone,即是模型对人脸特征的表达,我们的人脸数据多大几十万个id,此时使用 https://arxiv.org/abs/2203.15565 的技术,每次切换id到后面head,把任务作为分类任务训练。即代码中的
` module_partial_fc = PartialFC(
展开代码margin_loss, cfg.embedding_size, cfg.num_classes, cfg.sample_rate, cfg.fp16)`
文中提出的 Partial FC 网络解决了人脸训练遇到的问题:(1)类别太多会让模型变得很大很难训练;(2)样本不均衡;(3)样本噪声干扰。
config/XXXX.py 含义
设置一个配置文件:
python展开代码from easydict import EasyDict as edict
# make training faster
# our RAM is 256G
# mount -t tmpfs -o size=140G  tmpfs /train_tmp
config = edict()
config.margin_list = (1.0, 0.0, 0.4)  # 用于损失函数
config.network = "mbf"  # 选择backbone
config.resume = False  # 恢复训练
config.output = None  # 训练出的模型的存放地址
config.embedding_size = 512  # 模型最后的特征维度
config.sample_rate = 1.0  # PartialFC中负样本中心参与计算的比例,没太明白作用
config.fp16 = True  # 数值精度,fp16方便计算速度
config.momentum = 0.9  # 覆盖base.py中的设置
config.weight_decay = 1e-4
config.batch_size = 128
config.lr = 0.1
config.verbose = 2000  # 多少个batch后进行一轮val并显示
config.dali = False  # 显卡数据加载方式
config.rec = "/ssd/xd/datasets/faces_umd"  # 数据集
config.num_classes = 8277  # 多少个人的id
config.num_image = 8277  # 多少张图
config.num_epoch = 20  # 训练多少轮
config.warmup_epoch = 0  # 训练策略,warmup多少轮
config.val_targets = ['lfw', 'cfp_fp', "agedb_30"]  # 验证数据集选择
训练推导
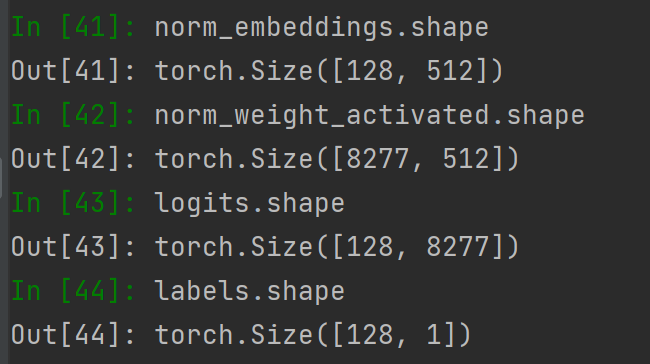
训练阶段,backbone分布在各个显卡,推导得到这个batch的local_embeddings,然后all_gather和cat之后成为一个合在一起的embeddings,下图就开始用 embeddings 进行 Partial FC 的计算。
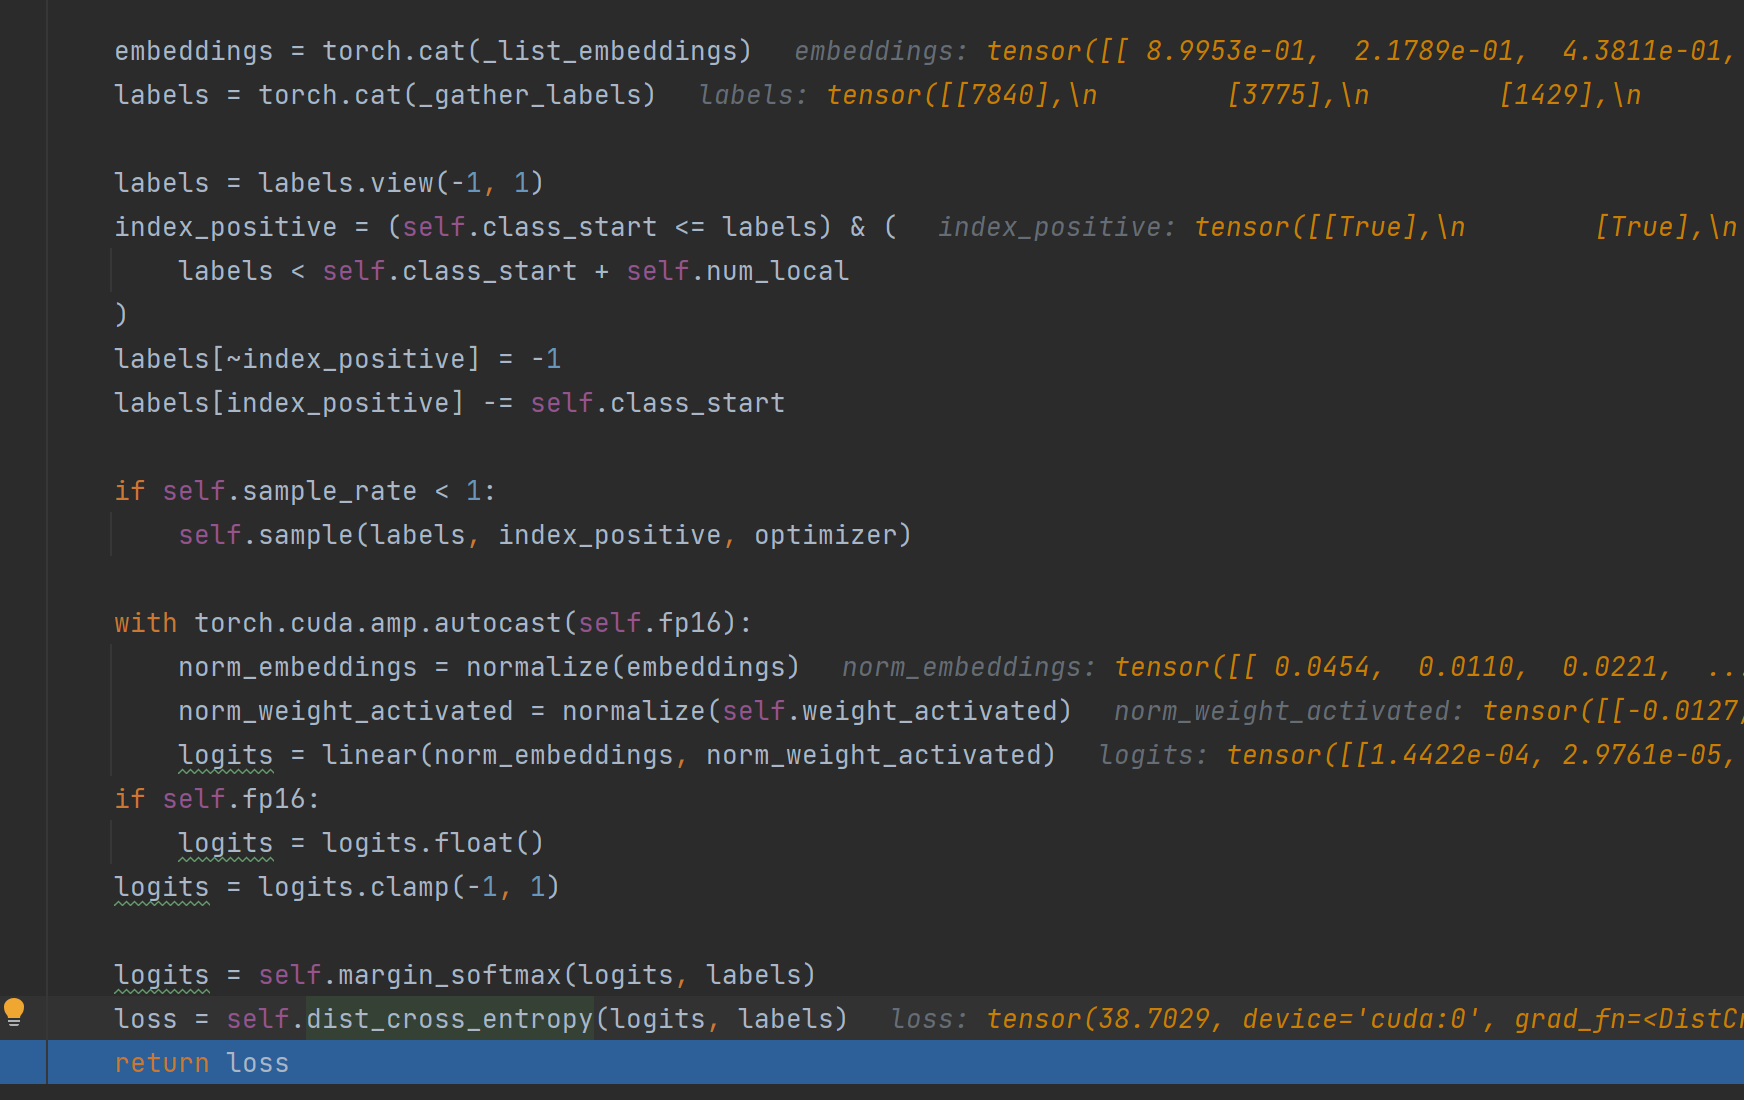
重点在于 logits = linear(norm_embeddings, norm_weight_activated)。最终 labels和logits 计算损失。
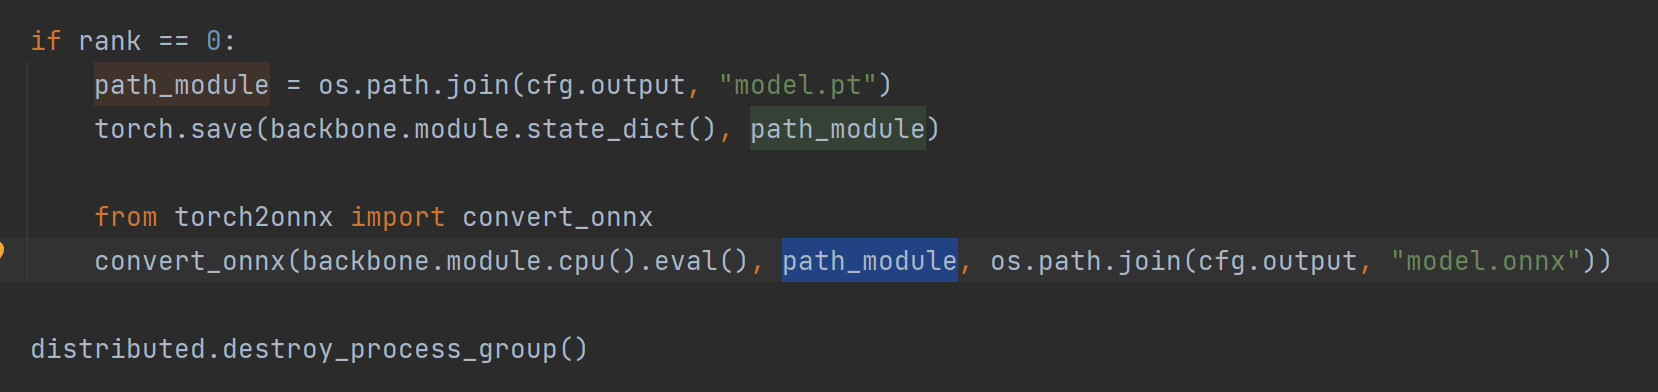
模型导出
所有轮次训练完成之后即可自动将backbone导出到onnx。
如何得到一个较好的特征提取器
当然是选择更多id的人参与训练,可以选择将多个数据集组成同一个数据集。


本文作者:Dong
本文链接:
版权声明:本博客所有文章除特别声明外,均采用 CC BY-NC。本作品采用《知识共享署名-非商业性使用 4.0 国际许可协议》进行许可。您可以在非商业用途下自由转载和修改,但必须注明出处并提供原作者链接。 许可协议。转载请注明出处!